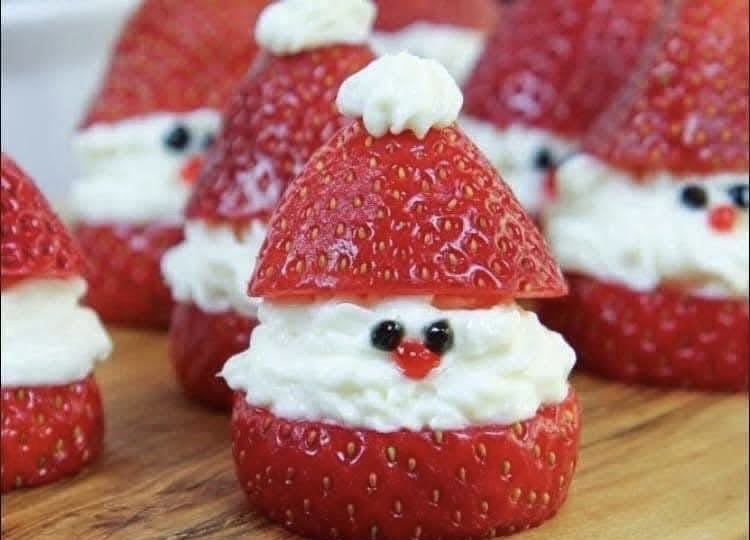
How to Make Adorable Cheesecake Strawberry Santas for the Holidays
Looking for a creative, fun, and delicious treat to brighten up your holiday celebrations? These Cheesecake Strawberry Santas are guaranteed to steal the show! Not only are they visually charming, but they’re also incredibly easy to make and perfect for any Christmas gathering. Follow this step-by-step guide to create these festive treats and impress your friends and family this holiday season.
Why Make Cheesecake Strawberry Santas?
These bite-sized delights combine the sweetness of strawberries with the rich, creamy flavor of cheesecake. They’re an ideal no-bake dessert option that’s perfect for both kids and adults. Whether you’re hosting a Christmas party, decorating a dessert table, or just looking for a fun activity to do with your family, these Strawberry Santas are the answer!
Ingredients You’ll Need
To make 12 Cheesecake Strawberry Santas, gather these simple ingredients:
• 12 strawberries (choose medium to large-sized ones for easier assembly)
• Whipped cream cheese
• 2 tablespoons powdered sugar
• 1 teaspoon vanilla extract
• Black and red decorator icing (for Santa’s face)
Tools You’ll Need
• A piping bag with a star tip (or a plastic zip-top bag with a small corner cut off)
• A sharp knife
• A mixing bowl and spoon
Step-by-Step Instructions
1. Prepare the Strawberries
• Wash the strawberries thoroughly under cold water and pat them dry with a clean kitchen towel or paper towels. It’s important to dry them completely to prevent the cheesecake filling from sliding off.
• Cut each strawberry into three parts:
• Slice off the stem to create a flat base so the strawberry can sit upright.
• Cut the top third off to form the “Santa hat.”
• Leave the middle section as the “body.”
2. Make the Cheesecake Filling
• In a mixing bowl, combine the whipped cream cheese, powdered sugar, and vanilla extract. Stir until smooth and creamy.
• Transfer the mixture into a piping bag with a star tip for easy application. If you don’t have a piping bag, you can use a zip-top bag and cut off a small corner.
3. Assemble the Santas
• Place the bottom section of a strawberry on a flat surface (flat side down).
• Pipe a generous swirl of cheesecake filling on top to create Santa’s “body.” Be sure to pipe it tall enough to leave room for the face.
• Gently place the middle section of the strawberry on top of the cheesecake filling, aligning it to form the body of Santa.
• Add a small dollop of cheesecake filling on top of the body to act as a “pom-pom” for Santa’s hat. Then, place the strawberry “hat” (the top section) on top.
4. Decorate Santa’s Face
• Using black decorator icing, carefully dot two small circles for the eyes.
• Use red decorator icing to add a tiny nose in the center of the cheesecake filling.
Tips for Perfect Cheesecake Strawberry Santas
1. Choose Fresh Strawberries: Firm, ripe strawberries work best for this recipe. Overripe or mushy strawberries may not hold their shape during assembly.
2. Chill Before Serving: Once assembled, place the Cheesecake Strawberry Santas in the refrigerator for about 20 minutes to set the filling. This helps them stay intact.
3. Get Creative: Feel free to add extra decorations like sprinkles or edible glitter to make your Santas even more festive.
Serving Suggestions
These Cheesecake Strawberry Santas are perfect for:
• Holiday dessert tables
• Christmas brunch platters
• Gifts for teachers, neighbors, or friends
• Fun family activities
Storage Tips
Store your Cheesecake Strawberry Santas in an airtight container in the refrigerator. They’re best enjoyed within 1-2 days for maximum freshness.
Why Your Guests Will Love Them
Cheesecake Strawberry Santas are not just a dessert—they’re a holiday experience! Their whimsical appearance and delicious flavor are bound to bring smiles to everyone’s faces. Plus, they’re a lighter dessert option compared to heavy holiday cakes and pies, making them a hit with everyone.
Final Thoughts
Creating these adorable Cheesecake Strawberry Santas is the perfect way to spread holiday cheer. They’re quick, easy, and guaranteed to be a crowd-pleaser. Whether you’re a seasoned baker or a beginner, you can easily whip up a batch of these festive treats in no time.
Happy Holidays, and enjoy making (and eating) these delightful little Santas!
Pin This Recipe for Later
Love this idea? Save it for your next Christmas party or share it with your friends and family!
