An Article on the Easiest Summer Dessert
There is nothing quite like a scoop of ice cream on a hot day, but the thought of pulling out a specialized ice cream maker or dealing with finicky custards can be intimidating. Enter this No-Churn Mango Ice Cream.
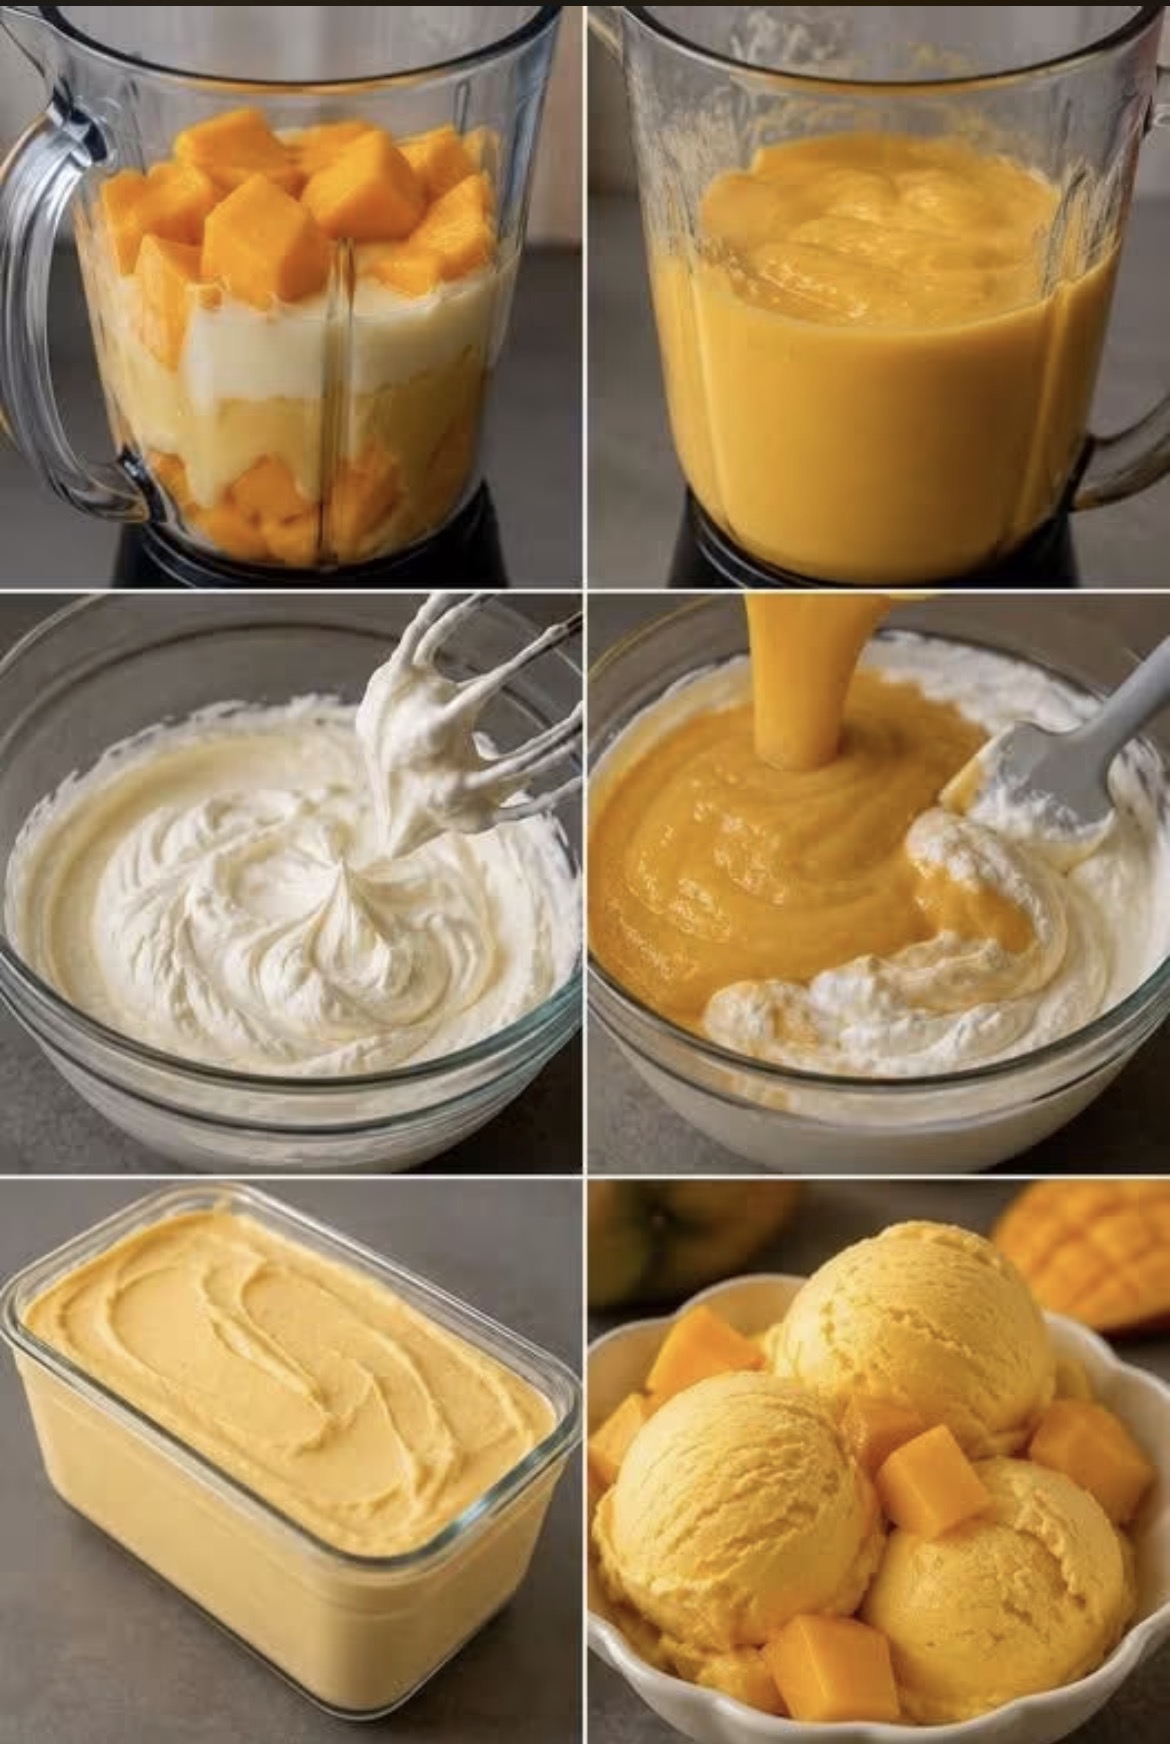
As seen in the visual guide above, this recipe relies on a simple culinary magic trick: heavy whipping cream and sweetened condensed milk. When you whip the cream to stiff peaks and fold in a vibrant, sweet mango puree, you create a base that freezes into a dessert that is richer, creamier, and more intensely fruity than anything you can buy in a tub.
This recipe is fantastic because it celebrates the natural sweetness of ripe, yellow mangoes. By blending them until smooth, you capture their peak flavor. Once frozen, it scoops beautifully and requires absolutely zero churning. Whether you are a novice baker or a seasoned home cook, this is the perfect, effortless summer treat.
The Full Recipe: No-Churn Mango Ice Cream
Prep Time: 20 minutes
Freeze Time: 4–6 hours (or overnight)
Servings: 6–8 scoops
Ingredients
· 3 large ripe mangoes (About 2 cups of cubed flesh. Tip: Alphonso, Ataulfo, or Honey mangoes work best for sweetness and color.)
· 1 can (14 oz / 397 g) Sweetened Condensed Milk
· 2 cups (480 ml) Heavy Whipping Cream (Must be cold)
· 1 teaspoon Vanilla Extract (Optional, but adds depth)
· Pinch of Sea Salt (Balances the sweetness)
Equipment Needed
· High-speed blender or food processor
· Large mixing bowl
· Electric hand mixer or stand mixer
· Rubber spatula
· Loaf pan or freezer-safe container (approx. 9×5 inches) with a lid
Step-by-Step Instructions (Follow the Images)
Step 1: Blend the Mango Base
As shown in the top-left and top-right panels.
Peel and cube the ripe mangoes. Add the mango chunks to your blender along with the sweetened condensed milk, vanilla extract, and a pinch of salt. Blend on high until the mixture is completely smooth, velvety, and vibrant yellow. Set this mango base aside.
Step 2: Whip the Cream
As shown in the middle-left panel.
In a large, chilled mixing bowl, pour the cold heavy whipping cream. Using a hand or stand mixer fitted with a whisk attachment, beat the cream on medium-high speed until stiff peaks form. (Tip: You know it’s ready when you lift the mixer and the cream holds its shape firmly without collapsing).
Step 3: Fold the Mixtures Together
As shown in the middle-right panel.
Take your mango mixture and pour it into the bowl with the whipped cream. Using a rubber spatula, gently fold the mixtures together. Do not stir vigorously! Fold in a figure-eight motion, scraping the sides and bottom of the bowl, until no white streaks of cream remain. You want to keep as much air in the cream as possible.
Step 4: Transfer and Freeze
As shown in the bottom-left panel.
Pour the combined, creamy mango mixture into your loaf pan or freezer container. Smooth the top with your spatula. Cover the pan tightly with plastic wrap (pressing it directly onto the surface to prevent ice crystals) or put the lid on.
Step 5: Wait for the Magic
Place the pan in the freezer for at least 4 hours, but for the best texture, freeze it overnight. The ice cream will firm up beautifully but remain creamy because of the fat in the heavy cream.
Step 6: Serve and Enjoy
As shown in the bottom-right panel.
When ready to serve, remove the pan from the freezer and let it sit at room temperature for 3–4 minutes to soften slightly. Use an ice cream scoop dipped in warm water to form perfect spheres. Serve in a bowl and top with fresh, diced mango cubes for an extra burst of flavor.
Pro Tips for Success:
· Keep it Cold: Ensure your cream is very cold before whipping; it will whip much faster and to a better volume.
· Fruit Substitutions: If mangoes are out of season, you can substitute them with the same amount of mashed strawberries, peaches, or even bananas.
· Storage: This ice cream will keep well in a tightly sealed container in the freezer for up to 2 weeks (though it rarely lasts that long!).